


How to Make a DIY Pillow Headboard for Your Dorm Room on a Budget
Moving into a dorm room is exciting. However, most dorm rooms look plain and uninviting right from the start. Bare walls, basic furniture, and limited space can make it hard to feel at home. The good news is that one simple project can completely change how your room looks and feels. A DIY pillow headboard is one of the easiest ways to add personality, comfort, and style without spending much money.
This guide walks you through the entire process. You will learn what materials to gather, how to build your headboard step by step, and how to style it once it is done. Whether you are crafty or a complete beginner, you can pull this off in an afternoon.
Why a Pillow Headboard Is Perfect for Dorm Rooms
Dorm rooms come with strict rules. You usually cannot drill into walls or make permanent changes. A pillow headboard works around all of that. It leans against the wall or hangs using removable strips. When you move out, it comes with you.
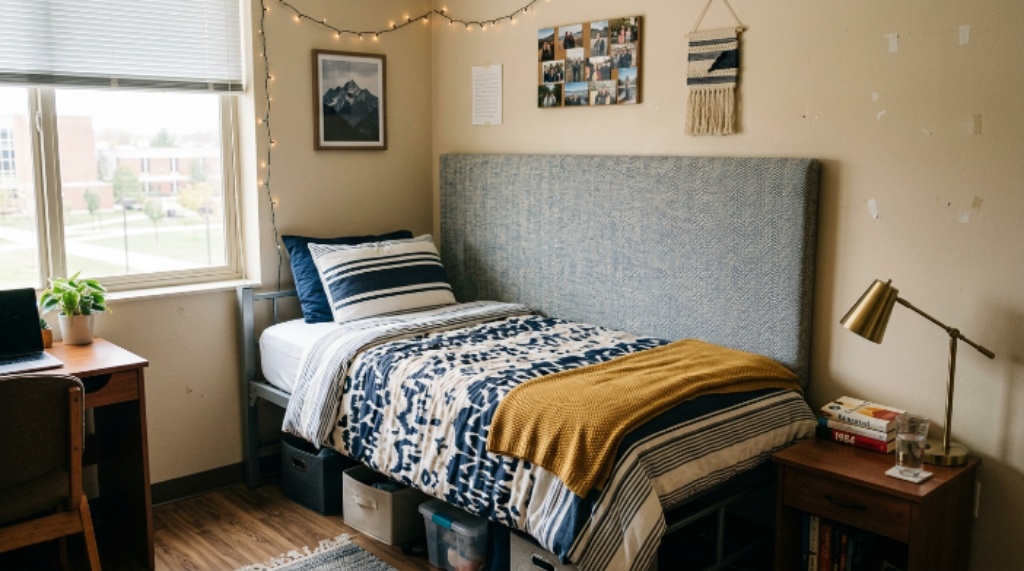
Beyond practicality, a headboard instantly makes a bed look more like a cozy bedroom setup. It creates a focal point in the room. Additionally, it serves a functional purpose — you can sit up and read or scroll your phone without leaning against a hard, cold wall. That extra comfort makes a real difference during long study nights.
This kind of project sits at the heart of budget dorm decor because it delivers big visual impact for a small investment. You can build one for as little as $20 to $40, depending on the fabric and materials you choose.
What You Will Need
Before you start, gather everything on this list. Having all your supplies ready saves time and keeps the process smooth.
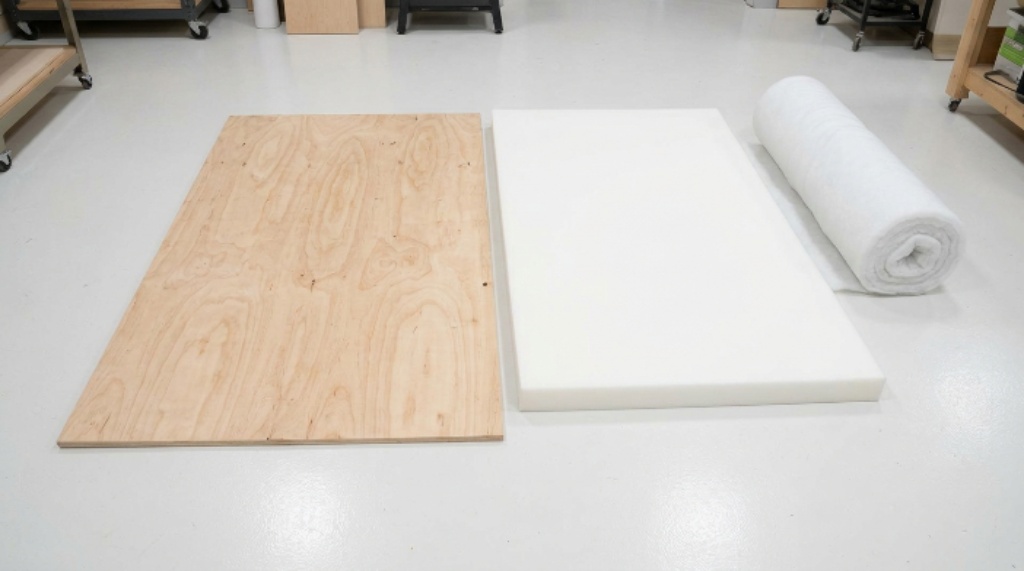
- One piece of plywood or foam board (cut to the width of your dorm bed, usually 38 inches for a twin)
- High-density upholstery foam, at least 2 to 3 inches thick
- Fabric of your choice (at least 2 yards for a standard twin headboard)
- A staple gun and staples
- Adhesive spray or fabric glue
- Scissors
- A measuring tape
- Command strips or a French cleat for wall mounting
- Decorative buttons or trim (optional, but adds a nice touch)
Most of these items are available at craft stores, fabric shops, or online. Look for foam offcuts and discount fabric to keep costs low. Thrift stores sometimes carry fabric by the yard at a fraction of the retail price.
Choosing the Right Size and Shape
Size matters more than most people realize. A headboard that is too narrow looks awkward. One that is too wide can overwhelm a small room. For a standard twin dorm bed, aim for a width of 36 to 40 inches. The height is up to you. Most headboards look best between 24 and 36 inches tall.
As for shape, keep it simple. A straight rectangular shape is the easiest to cut and cover. However, if you want something more interesting, a curved top or an arched design adds a elegant touch without much extra work. You can trace the shape onto your foam board using a pencil, then cut along the line with a sharp utility knife.
Step-by-Step Instructions to Build Your Headboard
Follow these steps in order. Take your time with each one, and the finished result will look clean and professional.
Step 1 — Cut Your Base
Start with your plywood or foam board. If you are using plywood, have it cut at a hardware store to save effort. If you are using foam board, a sharp utility knife and a straight edge are all you need. Cut the base to your desired width and height. Sand any rough edges on plywood so they do not snag your fabric later.
Step 2 — Attach the Foam Layer
Lay your upholstery foam flat on a clean surface. Place the base board on top of it. Trace around the edges with a marker, then cut the foam to match the board exactly. Apply adhesive spray to the top surface of the board. Press the foam down firmly and let it sit for a few minutes. The foam gives the headboard that soft, cushioned look that makes easy headboards so popular for bedroom upgrades.
Step 3 — Wrap with Fabric
Lay your fabric face-down on a flat surface. Place the foam-covered board face-down on top of the fabric. Leave about four to five inches of extra fabric on each side. Pull the fabric tight across the back of the board and staple it in place. Start from the center of each side and work your way toward the corners. Pull firmly as you staple to avoid wrinkles on the front.
For the corners, fold the fabric neatly, as if wrapping a gift. Staple the corner flaps flat against the back of the board. Trim away any excess fabric with scissors once all sides are secured.
Step 4 — Add Decorative Buttons (Optional)
Tufting, or adding buttons, gives the headboard a classic, upholstered look. To do this, push a long upholstery needle threaded with strong twine through the front of the headboard, through the foam, and out the back. Thread a button onto the twine on the front, and a flat button on the back to anchor it. Pull tight and knot it firmly. Repeat across the surface in a pattern you like. This step is optional, but it elevates the final look significantly.
Step 5 — Mount the Headboard
There are several ways to attach your headboard to the wall without drilling. Command strips designed for heavy objects work well for lighter foam board headboards. For heavier plywood versions, a French cleat system is more reliable. A French cleat is simply two pieces of wood with angled cuts that hook together — one piece goes on the wall, the other on the back of the headboard.
Alternatively, you can simply lean the headboard against the wall and secure the base between the mattress and the bed frame. This method requires no wall attachment at all and is completely damage-free.
Fabric Ideas to Match Your Dorm Style
The fabric you choose sets the entire mood. Here are some ideas to inspire you:
- Linen or cotton in a solid neutral color for a clean, minimalist look
- A bold geometric print for a modern, energetic feel
- Velvet fabric in a deep jewel tone for a cozy, luxurious touch
- Floral or botanical prints for a soft, nature-inspired vibe
- Denim fabric for a casual, laid-back aesthetic
Shop fabric sales, check discount bins, or even repurpose a duvet cover or curtain panel. Creativity is the real key to keeping this a true budget dorm decor project.
Tips to Make Your Headboard Last All Year
A little care goes a long way. If your fabric gets dusty, use a lint roller or a slightly damp cloth to wipe it down. Avoid pressing sharp objects against the foam, as punctures are hard to fix. Additionally, if the fabric starts to loosen at the back, simply re-staple it. The whole repair takes less than five minutes.
If you want to change things up mid-year, make a slipcover from new fabric and pull it over the existing headboard. This lets you refresh the look without rebuilding from scratch.
Conclusion
A DIY pillow headboard is one of the smartest projects you can tackle for your dorm room. It is affordable, easy to make, and completely removable. With just a few basic materials and a few hours of your time, you can transform a plain dorm bed into a stylish, comfortable centerpiece. The process involves cutting a base, layering foam, wrapping fabric, and mounting the headboard safely on the wall. From there, you can personalize it as much or as little as you like.
Therefore, if you have been looking for a way to make your dorm room feel like your own space, this is where to start. Easy headboards like this one prove that you do not need a big budget or professional skills to create something beautiful. All it takes is a little planning, the right materials, and a willingness to try something new.
Frequently Asked Questions
Can I make a pillow headboard without a staple gun?
Yes. Fabric glue is a solid alternative to a staple gun. Apply it along the edges of the back of the board and press the fabric down firmly. Use binder clips to hold the fabric in place while the glue dries.
How do I keep the headboard from sliding down the wall?
Placing the bottom edge of the headboard between the mattress and the bed frame is the most effective solution. The mattress holds it in position without any wall attachment needed.
What is the best foam thickness for a DIY headboard?
A thickness of 2 to 3 inches gives the headboard a full, cushioned look without feeling too bulky. Thicker foam is softer but may make tufting more difficult.
Can I wash the fabric if it gets dirty?
It depends on how the fabric is attached. If it is stapled on, spot-clean it with a mild detergent and a damp cloth. If you made a removable slipcover, you can machine wash it according to the fabric care instructions.
How long does it take to build a DIY pillow headboard?
Most people finish the project in two to four hours. If you include drying time for adhesive or fabric glue, plan for a full afternoon from start to finish.
Related Topics:
Safe and Eco-Friendly Baby Essentials: Your Complete Guide to Conscious Parenting
Best Training Collars for Large Dogs (Black Rhino Review)